
Chapter 30 Make it fancier

Now it’s time to customize our book even further. We can do a little bit of HTML and CSS work to add-on some fancy features.
30.1 Before you begin
- If this is your first time dipping your toe into styling with CSS, you might want to check out our CSS crash course.
- To stay organized, we recommend creating a folder called
assets/in your project directory and moving the CSS file calledstyle.cssthat came with your skeletal book into that folder. If you just followed the previous suggestion, then you’ll also want to update your
_output.ymlfile to show this change:Also, if you don’t already have one, create an
image/folder in your project directory.
30.2 Anatomy of a fancy book
Here’s where we’re starting:
And here’s where we’re going:
30.3 Aesthetics and branding
As the old adage goes, you shouldn’t just a book by its CSS—but we all know it’s a little hard not to. Bring your learners in and have them stay a while with an interface that’s welcoming, easy to ready, easy to use, and easy on the eyes.
30.3.1 Align the toolbar line
This first aesthetic adjustment goes out to everyone who notices the little things.
You may have noticed that the horizontal line from the toolbar and the TOC do not match up perfectly. This CSS will fix that:
- Open
style.css. Paste in the following, after any code that was already in here.
- Make sure each line within each of the curly braces
{}ends with a semicolon;. Save and Build your book to see how it looks.
Ahh, fixed. Now doesn’t that feel better?
Organize your CSS using comments like /* --insert-comment-- */ to create make-shift section dividers for your CSS, as we’ve done above.
30.3.2 Symmetrical code chunks
Another small thing you may have noticed is that the code chunks in bookdown don’t have equal spacing above and below the code. Let’s change that with the CSS below:
/*____Code Chunks____*/
.sourceCode pre {
margin: 0 !important; /* makes space above and below symmetrical*/
}
.sourceCode {
margin-bottom: 0.85em; /* adds same amount of margin as a <p> would */
}
30.3.3 Google fonts
To change the appearance of your text with a new font, you need to:
- Pick a Google font
- Add it to your CSS file
- Style specific text using CSS selectors
- Make sure your CSS file is linked to
_output.yml(and if you’ve been following along and using the book skeleton, it already will be).
30.3.3.1 Select and import your Google font’s script
Go to https://fonts.google.com/ and pick a font for your book’s main body text. We’ll choose
Muli, butLatoandSource Sans Proare other nice options.Select the font you want by clicking on the upper red
+sign, and navigate to the small pop up window.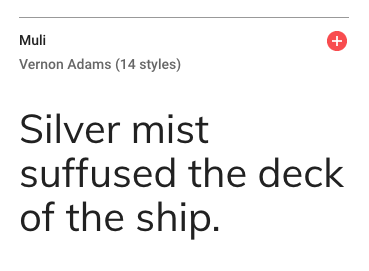
Figure 30.1: Selecting a Google font
Click on the
CUSTOMIZEtab, and select the extra font weights and styles you want. Don’t check any that you don’t think you’ll use (because it slows down your site’s loading time ever-so-slightly when you add more). In addition to regular, we’re choosing one italic and one bold.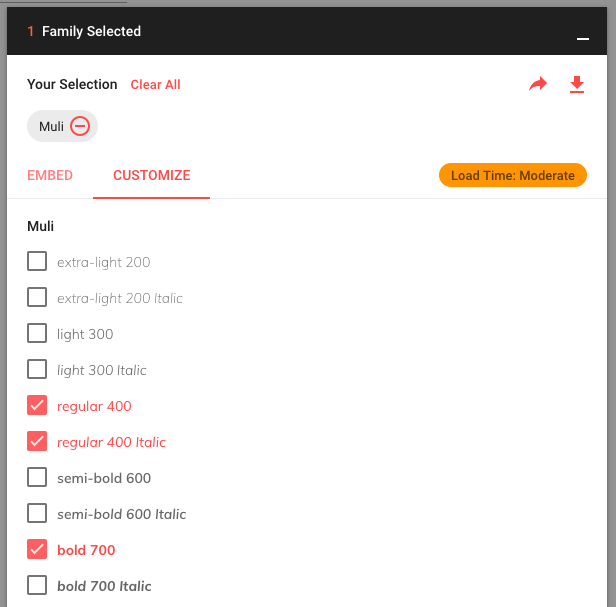
Figure 30.2: Choosing additional font weights and styles
Now click on
EMBEDand look under the@IMPORTtab. Copy the code within the<style>tags (you don’t need the style tags themselves). We will also need the second code chunk in a couple steps that saysSpecify in CSS, so keep this page open to come back to that.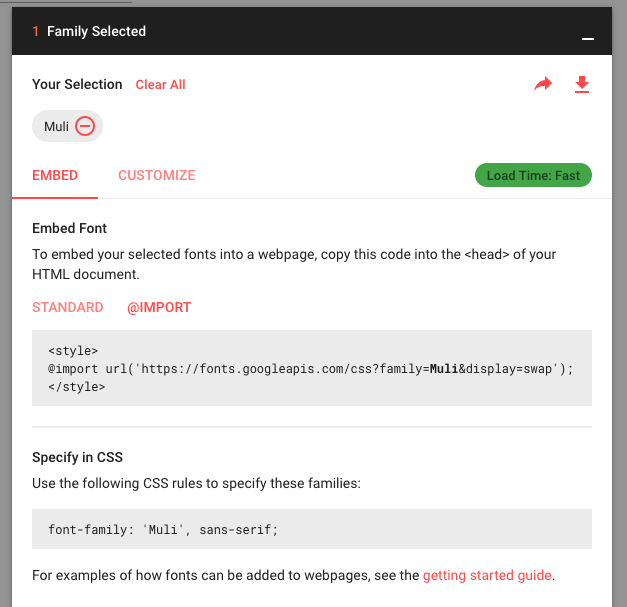
Figure 30.3: Getting the script to import your Google Font
We recommend going with sans-serif fonts (i.e. no little feet on the letters) for the main text because they’re easier to read at smaller sizes on screens compared to serif fonts. Don’t pick anything too narrow, too wide, or ornate.)
30.3.3.2 Import the font to your site
- Back in the RStudio IDE, open up your
style.cssfile. On the very first line, paste in the Google Font import code for the
Mulifont. This makes the font available within your bookdown site.
You might see others import Google fonts by embedding the script (with <script> tags) in an HTML file instead. This is perfectly legitimate. But if you’re just starting out, it’s easier to keep all the font stuff together in a CSS file, which is why we’re doing it this way.
30.3.3.3 Style specific text using CSS selectors
We have our fonts imported, but now we have to let site know which text gets what font. We want to apply the Muli font to our body’s text by using the font-family: property.
Add the following style rules to
style.cssbeneath the other CSS we’ve already added./*------------- Body and header text---------------- */ .book.font-family-1 { font-family: 'Muli', sans-serif; }- The
.book.font-family-1selects the book’s main text. - The CSS within the curly brackets
{}comes the second code chunk that we got from Google Fonts (see Fig 30.3). - The
sans-serifpart is a backup–it tells the browser to use any old sans-serif font in case there’s a problem renderingMuli.
- The
The perfect selector: By the way, a little insight in the the trial-and-error process of getting the right selectors: I first tried using body as the selector here, but it didn’t work. I would have never figured out that this selector would work by by using the tips we suggested in the CSS crash course to use the inspector and start hovering elements. So, .book.font-family-1 happens to be what identifies the main text of the book. No magic to this, folks. Just a little grit!
30.3.3.4 Confirm style.css is linked in _output.yml
If you’ve been following along using the book skeleton, then there’s nothing more you need to do to apply this font. But just for completeness, we’ll point out that if we were building our book from scratch without the skeleton, then in order for your hardwork in CSS to be work, we would need to tell bookdown that our CSS file exists by referencing style.css in _output.yml:
```yaml
bookdown::gitbook:
  css: assets/style.css
```30.3.3.5 Build, assess, and style more
Build and preview your book. Do you like the font that you chose? Now you can go back and pick fonts for other elements of your book.
Choose another Google Font for your book headers and title and repeat the steps above to add your header fonts to your CSS, using the selectors below to fonts to your headers, title, and subtitle (if you have one).
- We chose
Prataas our header font, and we added its import line of code right beneath where we importedMuliearlier:
- We chose
Optionally, we also change the
color:andfont-size:for the title and headers./*------------- Body and header text---------------- */ .book.font-family-1 { font-family: 'Muli', sans-serif; } h1, h2, h3, h4 { font-family: 'Prata', serif; color: #2f5275; } .title { font-family: 'Prata', serif; font-size: 3em !important; color: #5699cc; } .subtitle { font-family: 'Prata', serif; color: #2c6793; }- The selector
h1, h2, h3, h4separated by commas means that the styles will be applied to an element on our site that has any of the these classes–in this case, all level 1 through level 4 headers.
- The selector
Header fonts: Header fonts can have some more pizazz ✨, but stay away from the intense fonts like handwritings or very artsy looking things, unless you’re only applying it to the book title for dramatic effect.
Picking colors: You can add interest to text on your page without being distracting by choosing very dark flavors of your accent color as an alternative to choosing black. For example, when using a color picker, slide down to the darkest, almost-pure-black-but-not-quite version of your color of choice. Consider using this for your body text’s or headers’ color.
30.3.4 Add a logo
We’ll add a logo above our table of contents, taking advantage of some of the infrastructure that the book skeleton gave us in _output.yml. You need:
- A logo file. It’s better if it’s a PNG with a transparent background.
- To edit
_output.yml - To set the logo’s size with CSS
Let’s do it!
Place your logo image in the
image/folder.- Open
_output.ymland add two things:class="toc-logo"inside the opening<li>tag.- Replace the “header text” that used to be within the two
<a>tags and replace it with:<img src="images/logo-black.png">.
bookdown::gitbook: highlight: tango css: assets/style.css config: toc: before: | <li class="toc-logo"><a href="./"><img src="images/logo-black.png"></a></li>- We have to add the
class="toc-logo"in addition to the<img>tag, so that we can style this image in the next step with CSS.
- Open
style.css. Add the following to your CSS. This will make space for your logo image above your TOC.
- Build and preview your handywork.
Go back to the CSS and adjust the
width:parameter of.toc-logoto adjust the size of your logo.
Make sure that your logo file makes it into the images/ folder that lives inside the docs/ folder. This is supposed to happen automatically when your book is built, but we find that there’s a bit of mystery around this actually being the case. If you don’t see your logo file in docs/images/, then just break one of our golden RMD rules, and copy your logo file there manually.
30.3.5 Custom link colors
Links are great ways to pepper your site with an accent color without it becoming too overwhelming. Let’s style the links’ regular appearance and also what they will look like when hovered over.
Optionally, have a color picker open in a nearby tab to help with selecting some good hexcode colors.
Paste the following into
style.cssto accomplish this. And yes, the CSS selectors for the links are annoyingly long and specific.Choose a color for all the links in the main text. A safe bet is to choose something that is similar-ish to what we chose for our
.titlecolor. Replace the#hexcode with the one for your color of choice in the top style rule above.Choose a second color that’s a bit darker or ligher, that will be the link color when you hover over it. Replace the
#hexcode with the one for your color of choice in the bottom style rule.It’s already in the pasted code, so nothing to change, but
text-decoration: nonein the bottom style rule is what gets rid of the underline that appears when we hover.
30.3.6 Add a hero image
A hero image is “web-speak” for the large banner image that usually stretches across the page of many websites. We can sort of accomplish this in bookdown with a combination of both HTML and CSS. The image will not go all the way across the page, but will stop at the TOC. Before you decide to implement this, you should first know that this image will appear at the top of every single book page. If you feel like that will visually wear you out, then either skip this step, or think carefully about choosing an image that doesn’t have too much going on.
You’ll need:
- An image. This should be an image that will still look good when it appears large across the screen. Some good options here.
- An HTML file
- CSS to style the image
- To edit
_output.yml
Let’s get started:
30.3.6.1 Embed the image in an HTML file
Create a new HTML file by going to File > New File > Text File.
Paste these contents at the top of the file.
<link href="style.css" rel="stylesheet">
<div class="hero-image-container">
  <img class= "hero-image" src="../images/books.png">
</div>
<link href="style.css" rel="stylesheet">will allow any content we put in this HTML file to be styled by the CSS file we’ve been working on.- The
<div class="hero-image-container"> </div> tags will serve as the "container" for our image. The reason we bother with putting our image in a "container" at all is because this can make it easier to position and size our image later on the page. We give it a class name“hero-image-container”` because that’s what we’ll use as a selector to style it in our CSS. - The
tag itself is where we actually specify the image path.
Replace the file path to the image (what comes within
src= " ") with your own file path.Save this HTML file in your project directory, ideally inside of the
assets/folder. Name ithero-image.html. You can choose a different name.
30.3.6.2 Add the HTML file to _output.yml
Now we tell bookdown that this HTML exists and that we want its contents (our image) to be the first thing in the <body> tag of our site:
- Open up
_output.yml. Add the
includes:andbefore_body:options with a path to yourhero-image.htmlfile.
30.3.6.3 Position and style the image with CSS
Finally, we add CSS to the styles.css file to style and position the image in the right spot. This might take a little bit of rendering and adjusting to get it just right.
- Open
style.css Paste the three style rules below into your CSS.
Change the
background-color:to a color that that will match your image. Why does an image need a background color? This is important because it will give the container some “placeholder” content while your image loads or in case your image doesn’t render. (If your hero image has some transparency, then your background color will be visible).Note: The
height:of.hero-image-containermust be the same height that you choose for the.hero-image. The height you choose is up to you. It does not necessarily have the be the same height as your image file.Note: To disable the hero image (especially if you’re using the rstudio4edu template), you can add
display: none;to each of the first two style rules as an additonal line, and then comment out the third style rule above below, using/*on it’s own line just above where the style rule begins and*/after its closing the curly brace}.Build your book, and see if you like your hero image choices!
A little more about what’s going on under the hood:
position: absolute: To make the image go all the way across the page (not including the table of contents), we have to make the container that the image sits inposition: absoluteand then spell out its position explicitly (withtop,left,right, etc. all set to0.) These positions are relative to the container that.hero-image-containeritself is inside..page-inner: All of our book content is by default inside a container labelled.page-inner. We don’t want our book content to get stuck hiding behind the big image we just stuck to the top of our page. So, we need to move the book content down by at least the height of our image + some wiggle room of about 10px. That’s what adding so muchpadding-top:is doing here.
30.4 Usability
The next three additions are less about aesthetics and more about making your book easier to read and use. We’ll add:
Custom sidebar div tips: These are the “notes” boxes scattered throughout a book that point out tips or warnings or note. You can create differently styles div tips for different purposes.
Anchor links: These linked icons next to every section header make it easy for readers to link and share specific parts of your book. See this resource.
- Copy to clipboard: This creates small clipboard icons within code chunks that let your users quickly copy and paste from book to script.
30.4.1 Custom div tips
- Open your
style.cssfile. Paste the following two style rules into your CSS file:
/* -----------Sidebar div tips------------- */
/* from r-pkgs.org*/

  div.puzzle, div.fyi, div.demo, div.note {
    padding: 1em;
    margin: 1em 0;
    padding-left: 100px;
    background-size: 70px;
    background-repeat: no-repeat;
    background-position: 15px center;
    min-height: 120px;
    color: #1f5386;
    background-color: #bed3ec;
    border: solid 5px #dfedff;
  }

div.puzzle {
  background-image: url("../images/Your-turn.png");
}

div.fyi {
 background-image: url("../images/fyi.png");
}

div.demo {
  background-image: url("../images/Live-code.png");
}

div.note {
  background-image: url("../images/lightbulb.png");
}
Format the color of the box by changing
background-color:and change the color of the text of the div tips withcolor:.With this styling, all div tip sidebars will be the same except for the icons. Those are controlled with
background-image:. You can swap the image paths out for ones of your own if you want to use different images.Use the div tips, in any of your
.Rmds. For example, here’s what it looks like to use thediv.puzzleone::::puzzle You use a div tip by writing `:::` following by the name that you assigned to it in the CSS after the `div`. :::Which makes a div tip that looks like this:
You use a div tip by writing ::: followed by the name that you assigned to it in the CSS after the div.
30.4.2 Anchor links
The steps that follow are an abbreviated version of the tutorial that you can find here.
Here’s what we’re going to use to make anchor links:
- A wee bit of javascript in a .js file (“but I know nothing about javascript!” you say?–don’t worry, you don’t need to. Copy/paste is all you need).
- An HTML file
- Some CSS style rules.
- Linking our HTML file to
_output.yml.
30.4.2.1 Add javascript to make anchor links for all section headers
In RStudio, go to File > New File > Text File .
Paste the javascript below into this new file.
$(document).ready(function() { // Section anchors $('.section h1, .section h2, .section h3, .section h4, .section h5').each(function() { anchor = '#' + $(this).parent().attr('id'); $(this).addClass("hasAnchor").prepend('<a href="' + anchor + '" class="anchor"></a>'); }); });- This code essentially says, “Wait until the page is loaded and ready, and when it is, find every section header and tack on a link to itself right before that header.” The other important thing the javascript file will do is to add a CSS class
"hasAnchor"to each of the headers. This is part of what will allow to style our anchor links with CSS in a couple steps.
- This code essentially says, “Wait until the page is loaded and ready, and when it is, find every section header and tack on a link to itself right before that header.” The other important thing the javascript file will do is to add a CSS class
Save the file as
book.js. (You can give it another name, but the convention is usually to name it file after the project you’re using it for.) Save this file in your working directory or in theassets/folder.
Phew–you’re done with the javascript code now!
30.4.2.2 Embed book.js into HTML file
We’ll make an HTML file that will refer to our javascript file.
In RStudio, go to File > New File > Text File .
Paste the line below into this new file.
- Modify the path in quotes to point to your javascript file if yours is not in your working directory.
Save this file as
header.htmlin your project directory or in theassets/folder. You can choose a different name if you’d like.
tags needed*: If you have a little experience with javascript, then you may know that any javascript <script> tags usually need to be placed within <head> tags, too. We don’t need to use these here because this little line of code will be automatically injected within our bookdown’s existing <head> tags when we use includes: in_header: in a few steps.
:::
30.4.2.3 Add CSS to show anchor links
In our javascript code, we had the class "hasAnchor" be programatically added to our sections headers. So, we can now style them so that each time we hover over the section header, the anchor link icon will become visible.
- Open your
style.cssfile. Paste the CSS below to this file. These will govern the anchor link icon’s position, size, and color.
/* -----------Section anchors -------------*/

.book .book-body .page-wrapper .page-inner section.normal {
  overflow: visible !important; /*so anchor link doesnt get cut off */
}

a.anchor {
  margin-left: -30px;
  padding-right: 3px;
  display:inline-block;
  width: 30px;
  height: 30px;
  background-image: url(https://image.flaticon.com/icons/svg/34/34735.svg) !important;
  background-repeat: no-repeat !important;
  background-size: 20px 20px !important;
  background-position: center bottom !important;
  opacity: 0;
}


.hasAnchor:hover a.anchor, a.anchor:hover {
  opacity: 0.6;
}

@media (max-width: 1144px) { /* dont show anchor link on small screens */
  .hasAnchor:hover a.anchor {
visibility: hidden;
  }
}
30.4.2.4 Add anchor link elements to _output.yml
We created all the anchor link infrastructure, now we just need to tell bookdown about it by referencing it in our _output.yml.
- Open
_output.yml, located in your project directory Reference your HTML file with the
includes: in_header:option underneathbookdown::gitbook. Make sure CSS file is also referenced. This part of your_output.ymlshould look something like this:Save and build your book to check that everything has worked!
30.4.3 Copy to clipboard
Here’s what we’re going to need to make copy to clipboard buttons:
- A little javascript in a .js file (we can add on to the .js file we used to make the anchor links).
- An HTML file –we can use the same one we created for the anchor links above.
- One CSS style rule
- Linking our HTML file to
_output.yml(you already did this if you created the anchor links).
Open
book.jsthat you created for making section anchors. If you didn’t make section anchors, then go back and do 1) and 3) from this section.Paste the following javasript into into the
book.jsfile, beneath the other javascript from your section anchors.
$(document).ready(function() {

  // Copy Button
  $chunks = $('pre.sourceCode > code.sourceCode');
  $chunks.each(function(i, val) {
    $(this).prepend("<button class=\"button copy\"><i class=\"fa fa-copy fa-2x\"></i></button>").click(function() {
      var $temp = $("<textarea>");
      $("body").append($temp);
      var content = $(this).clone().children("button").remove().end().text();
      $temp.val(content).select();
      document.execCommand("copy");
      $temp.remove();
    });
  });

});
- Open
style.css. - Add the following to style the appearance of the button:
.copy {
  width: inherit;
  background-color: #e2e2e2 ;
  border: none;
  border-radius: 2px;
  float: right;
  font-size: 60%;
  padding: 4px 4px 4px 4px;
}- Build and preview your work!
30.5 Table of Contents
Now comes the time to style the TOC. It’s a huge part of the book’s appearance, so we can get a lot of bang for our buck if we’re intentional about our choices here. All of these changes will be made using CSS alone.
We will:
- Change the TOC background color
- Style the TOC links
- Make the TOC hierarchy clearer by adding space and styling Part titles
30.5.1 Change TOC background color
- Open
style.css. - Paste in the CSS below. The selector for the Table of Contents is
.book-summary. - The
border-right: noneparameter removes the line that separates the TOC by default.- If you want to keep the little line, then either remove
border-right: none;below, so that bookdown will keep the default line. - Alternatively, style the line differently by replacing
nonewith a different thickness, color, and line-type (e.g.border-right: 5px #5699cc solid).
- If you want to keep the little line, then either remove
We chose white as the background color for the TOC because we think it helps “open up” the space. But feel free to experiment here.
30.5.2 Style the TOC links
Adding to the TOC style rules we started above, now we’ll change the font, color, active, and hover behavior for all the links.
Change the TOC font, paste in the CSS below. You’ll have to choose from a font that you already imported earlier.
Change the color by adding the CSS rule below. We also add
paddingin all directions, to give the TOC items a bit more breathing room.For a different color for links that are hovered, you can add the CSS rule below.
- Add style for active links. Active links indicate which page you’re actively viewing. We’ll do two things:
- Change the
color:of the link. We chose the same color as our.titlein this case. - Add a left border of the same color to draw more attention to the active link within the long list of other links in the TOC.
- Change the
When you add a border-left: with a thickness of 4px, it will shift over the text by 4px, too. So, compensate for this by overriding the original padding-left: 15px that we set in an earlier style rule with a new padding-left: that is 4px less. That’s why we ended up with 11px here. The !important is what signals the override.
We like choosing TOC text colors that aren’t too flashy. Save the pops of color for hovering or active link behavior. Here we went with the same dark color that we used for h1, h2, etc.
30.5.3 Hierarchy styling
Lastly, we make it clearer which chapters belong to the same part by styling the Part titles a bit differently.
Give breathing room, darken, and make uppercase
Copy and paste the CSS rule below.
li.appendix span, li.part span { /* for TOC part names */ margin-top: 1em; color: color: #1c3046 !important; opacity: 1 !important; text-transform: uppercase; }- We added
margin-top: 1emfor some much needed space above each Part title.
- We choose a
color:that is similar to the dark blue of the links, but even closer towards black on that spectrum without going all the way to black (#000000). - By default, bookdown gives Part titles an opacity that makes them appear light-colored. We have to override this, by choosing an opacity of
1. We also make these Part title uppercase.
Unnumbered first chapters
If you’re using Parts for your book, then you might want to use the first (unnumbered) chapter of each part as an intro chapter to that Part. You can style this ununumbered chapter differently with the following CSS. We make it uppercase.
```style.css
/* grabs first .chapter immediately after .part...but only those ch without numbers */
.part + li[data-level=""] {
 text-transform: uppercase;
}
```
Now time to build and preview your fancy book!