
Chapter 19 Dress it up!

The focus of this section is to show you “built in” ways for you to change the way your site looks and feels without needing any custom style. What does this mean? This means you don’t need to know or use CSS, otherwise known as Cascading Style Sheets to make any of the changes we demo below.
19.1 Before you begin
Let’s return to our site, right where we left off. You should have already added your own content, but for simplicity, I’m going to continue with the boilerplate demo that we’ve been showing. Your content does not have to be the same as mine from this point forward.
The sections below go through a list of built-in ways you can give your site a face lift by editing the YAML. There are a lot but don’t feel overwhelmed. Most of these options are à la carte – so go ahead and scroll on down and see if there are any you like!
Let’s try out some different options. Build your site or use rmarkdown::render_site() after trying each one out to see how the change affects your site.
If these customizations leave you wanting more, then be sure to check out the “Make it fancier” chapter.
19.2 One YAML to rule them all

We start off with a closer look at _site.yml. This file is like the orchestra conductor of our site.
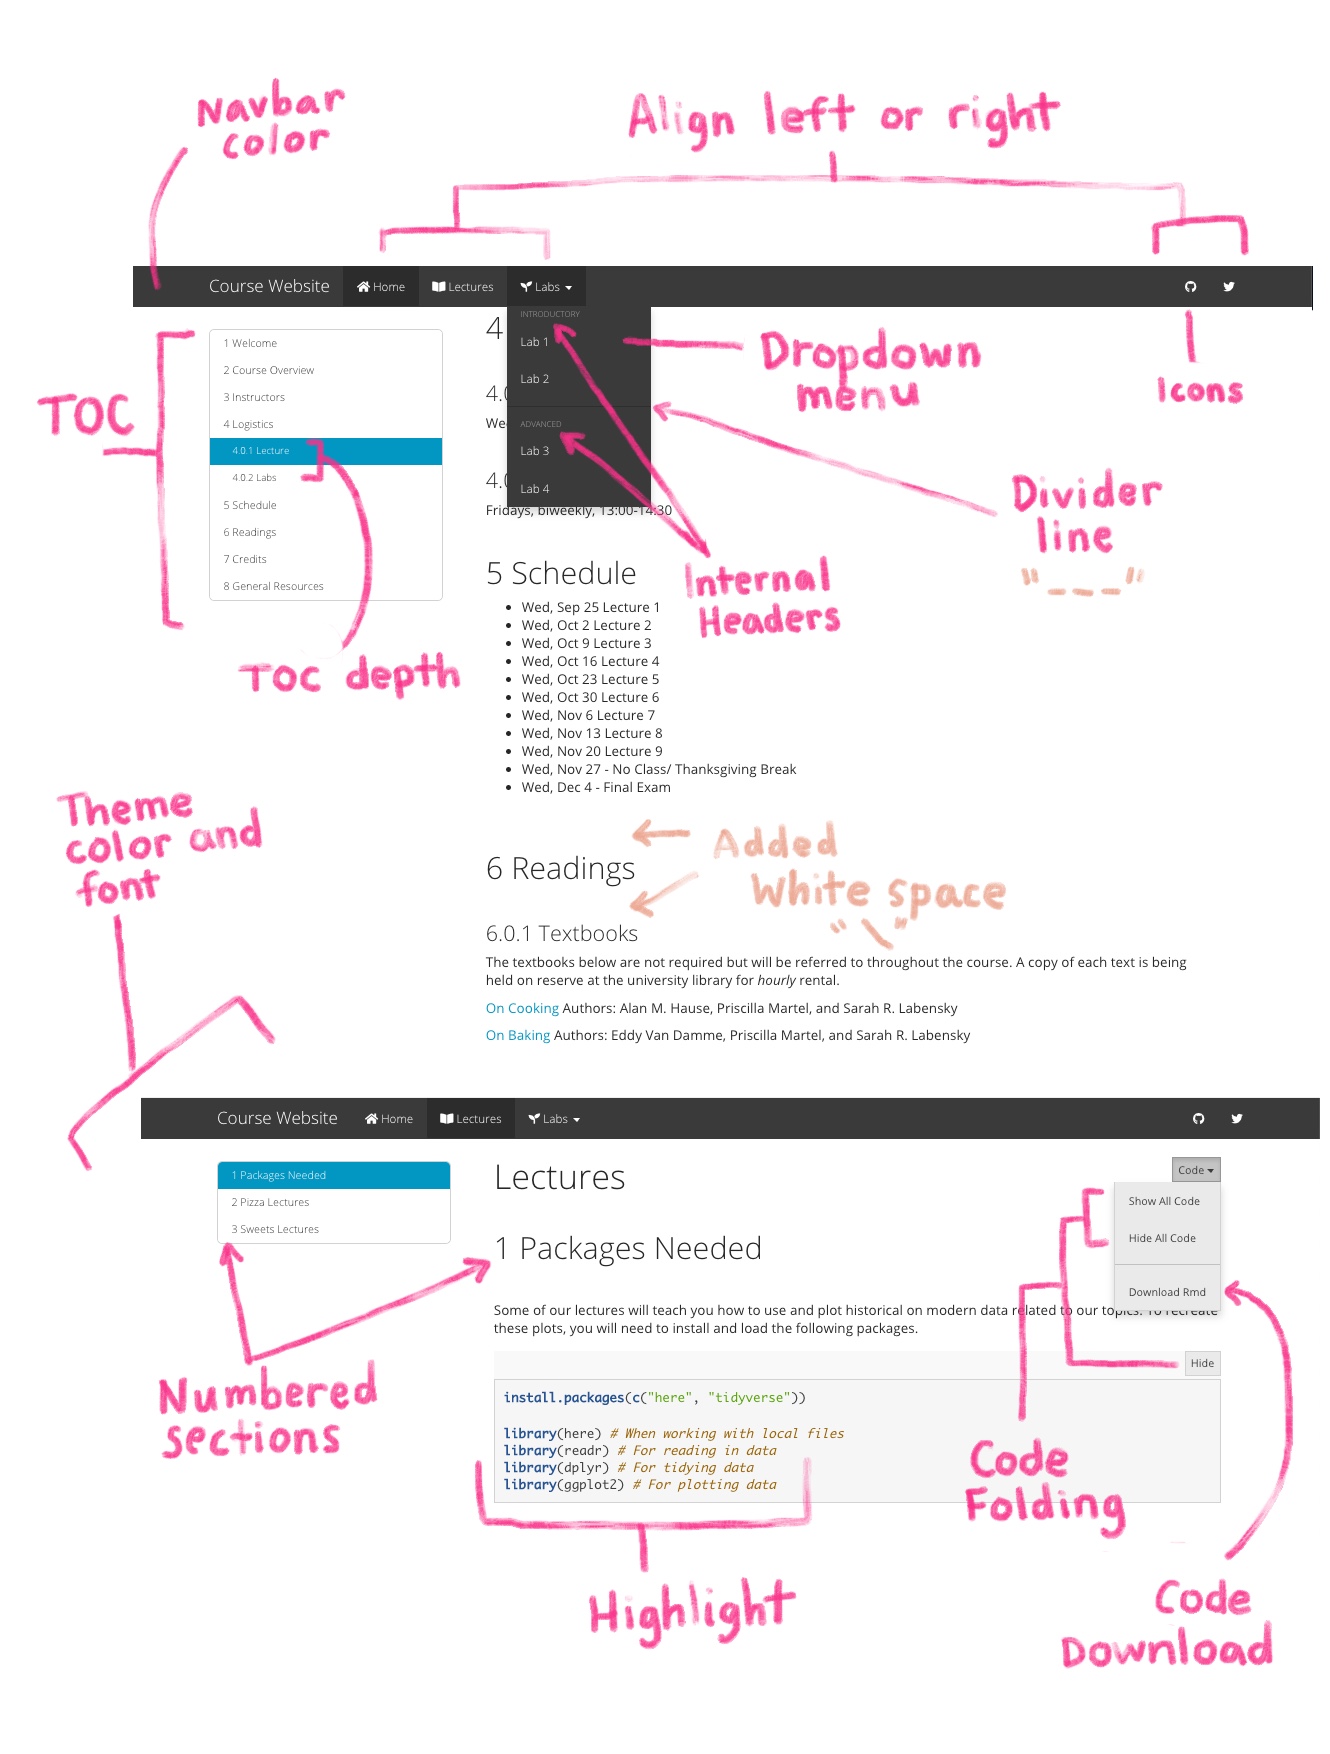
The _site.yml file directs the R Markdown site generator how to build our whole site from the different sections . The file is written in YAML (which in the programming world is just a language that is easy-ish to read and usually deals with configuation settings). _site.yml is not only what creates the navigation bar (a.k.a “navbar”) for us, but it’s also mission-control for layout and aesthetics options, as we’ll see soon.
Normally a single R Markdown document will have its own YAML. When we make an R Markdown site, we have a new tool, the _site.yml, which is a global YAML file. This YAML acts as a default YAML setting for all the .Rmds that will go into our website. This is useful if, for example, we want the table of contents to appear on every site page, but don’t want to have to write it at the top every individual .Rmd. Just throw it in once to _site.yml and have all your YAML options apply globally.
What happens if one of your R Markdown documents in your site still has its own YAML at the top? Then the YAML options at the top of that R Markdown document will apply to that document only. An individual .Rmd file’s YAML will override the global _site.yml. This can actually be useful when some options are only applicable to a single page on your site. For example, the code_download option, which we demo in the next section, might not be relevant for all your site pages, so you can reserve this for individual page YAMLs only. If an individual page’s YAML and the _site.yml conflict, then the more specific option will always win (i.e. the individual YAML).
19.3 Applying what you can from a single lesson
We won’t cover it again here, but you should also add the following things that we already covered in the single Rmd lesson
- Floating TOC
- White Space
19.4 Add a site theme
Open your _site.yml file, and let’s begin our site makeover. We’ll start with setting up our _site.yml to apply a theme to our site. Themes are blanket ways of dressing up your site’s aesthetics quickly. We highly recommend picking a theme for your site! You have 14 theme options:
default,cerulean,journal,flatly,darkly,readable,spacelab,united,cosmo,lumen,paper,sandstone,simplex, andyeti(usenullfor no theme)
You can preview them all here.
Here is how you give your website a theme:
Open
_site.yml.Add these 3 lines to the bottom of your
_site.ymlfile; let’s give every page the sametheme = "yeti"(Remember! Indentation and new lines matter very much here):
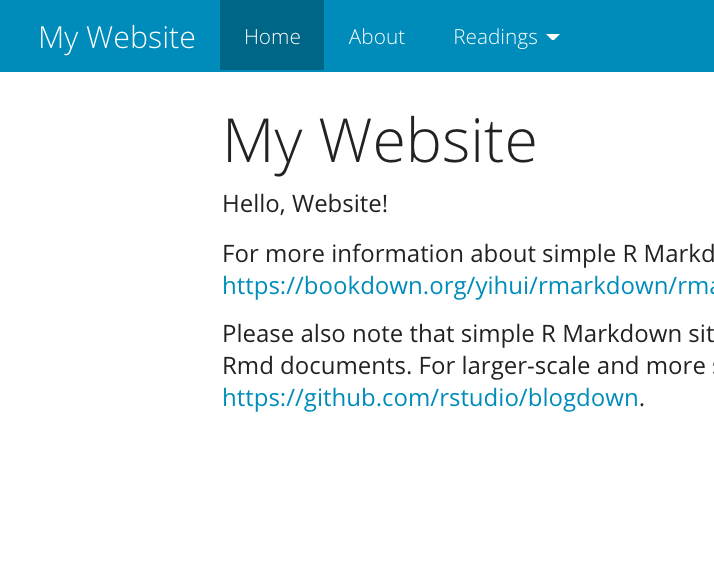
Save your _site.yml file then re-build your site. Your YAML should like this, and your site should now be themed.
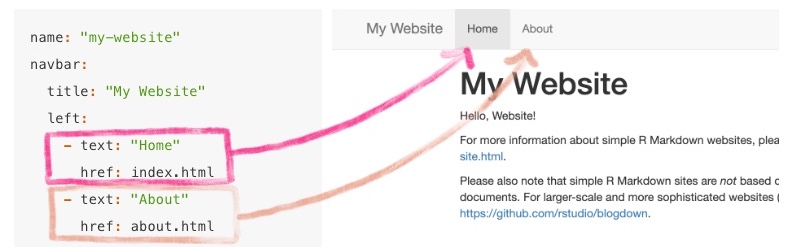
name: my-website
output_dir: docs
navbar:
title: My Website
left:
- text: Home
href: index.html
- text: About
href: about.html
- text: Readings
menu:
- text: Module 1
href: readings-module1.html
- text: Module 2
href: readings-module2.html
- text: Module 3
href: readings-module3.html
- text: Module 4
href: readings-module4.html
output:
  html_document:
    theme: yeti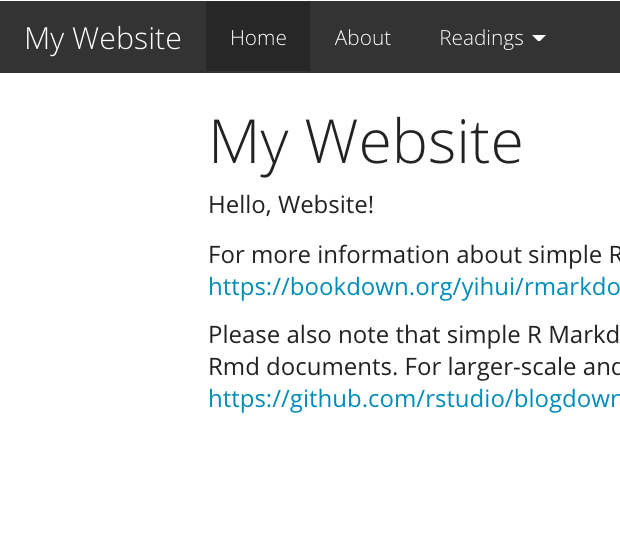
Figure 19.1: Add a site theme
Within any YAML, pay careful attention to the indentations and spaces. YAMLs are fussy about this, and this is often the source of many errors!
19.5 Customize code highlighting
Now that we have a theme, we may also want to change how our code looks. Again, we have a few built-in options:
default,tango,pygments,kate,monochrome,espresso,zenburn,haddock, andbreezedark
Check out what these look like here.
Add a highlight style by creating one new line with the key highlight, nested underneath the html_document: line:
name: my-website
output_dir: docs
navbar:
  title: My Website
  left:
  - text: Home
    href: index.html
  - text: About
    href: about.html
  - text: Readings
    menu:
    - text: Module 1
      href: readings-module1.html
    - text: Module 2
      href: readings-module2.html
    - text: Module 3
      href: readings-module3.html
    - text: Module 4
      href: readings-module4.html
output:
  html_document:
    theme: yeti
highlight: tango
19.6 Change the navbar color
Each site “theme” has a built-in color for the navigation bar, but there is also an alternate navigation bar color we can activate by swapping out the theme type from default to inverse. This means that each site theme can really generate two distinct “looks”.
See Figure 19.1 for a reminder of what the default navbar color looked like. For the next few examples, we’ll stick to using the default.
19.7 Add navbar icons
In Caring for your site, we saw how to add new pages and grow your navbar. When you add text and href fields to your navbar, you can also add sprinkle in an icon: <icon-prefix-and-name> either in addition to or in place of text. Using icons in place of text is often used to provide links to outside sources (e.g., Slack, GitHub, etc.) or to other pages within your own site. You can use any* icons from Font Awesome, by entering the prefix fa- followed by the icon’s name.
Well, you can’t really use any font awesome icon. It has to be a font awesome icon from a version that R Markdown has loaded. At the time of writing this means only using icons that are from version….
Here is a basic navbar:
Here is the output:
Left navbar
Right navbar
![]()
19.8 Tidy up the dropdown menu
There’s a little more accessorizing we can do with the dropdown menu.
Add divider lines to create sections in the dropdown with
- text: "---".Add internal headers with a
- text:line without anhrefline immediately underneath it.
name: my-website
output_dir: docs
navbar:
  title: My Website
  type: default
  left:
  - text: Home
    href: index.html
  - text: About
    href: about.html
  - text: Readings
    menu:
    - text: Semester 1
    - text: Module 1
      href: readings-module1.html
    - text: Module 2
      href: readings-module2.html
    - text: '---------'
    - text: Semester 2
    - text: Module 3
      href: readings-module3.html
    - text: Module 4
      href: readings-module4.html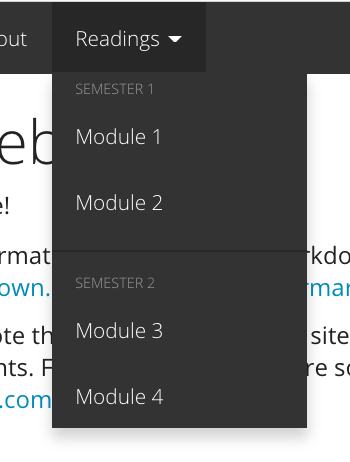
19.9 Recap
- Theme
- Highlighting
- Inverse color navbar
- Icons
- Dropdown divider